A guide to help you handle image post production, develop your images, file handling and output…
This is never going to be an exhaustive tutorial. In fact it will barely scratch the surface. Image post production is a vast and complicated subject but that doesn’t matter because all we need to do here is to get your photos out of your camera and onto your website/blog page/Facebook or whatever with the minimal fuss and bother.
I’m going to talk only about Jpeg files here. If you shoot RAW, I’m going to assume you have all the necessary software (RAW converter) and enough knowledge to handle this yourself.
Download from camera
Use either the USB cable that came with your camera or a proper card reader that connects to your USB port on your computer. Card readers are best. USB cables carry a live feed to power the USB device and a cable without a proper electronic suppressor fitted (the fat blobby, cylindrical thing on the end of the cable) you could theoretically harm the camera’s electronics. I’ve heard of anyone having this happen but I’ve read about it so…I’m just saying. Anyway, card readers are generally quicker to download a lot of images.
Using your download software
OK, if you are downloading images for the first time you are going to need some sort software package to handle the incoming photos. You certainly already have an in-built system for handling photos on your operating system but bear in mind that these applications are generally intended for folks downloading family snaps and such from compact cameras and offer only the most basic tools for “fixing” your JPEG photos (they won’t handle RAW). They are quick, convenient and of course free but there are better ways of doing it.
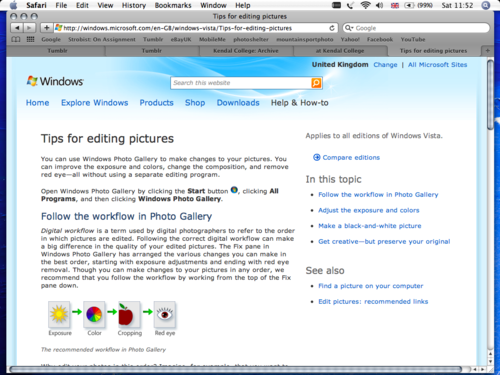
Windows PC: If you are working with a PC computer running Windows Vista,read the following article, it tells you how to do everything:
Windows 7 users can watch a video all about importing photos onto their system here:
Mac users: If you run a Mac as many photographers do, you already have a complete photo package built in called iPhoto and you at this stage you don’t really need anything else. Eventaully, like all photographers you’ll start wondering about Photoshop, Lightroom or Apple Aperture but right now iPhoto’s got everything you need to get started.
There’s some great video’s on using iPhoto on the Apple website - here’s one:
Getting more information about importing photos
The easiest way to find out how to do something on your computer (or your camera) is to Google it! Couldn’t be easier. Just type your question into the Google search box and find the answer on-line. There will be pages and pages of articles, forum discussions and website tutorials on just about anything you need to know.
Camera makers own OE software
If you have a picture package software application that came with your camera, that might do a good job too. Nikon and Canon tend to do pretty good software applications, but some aren’t so good. You’ll just have to try it and see what you think.
IMPORTANT NOTE: whatever application you use, when you are downloading images from your camera to your computer there are three things that you must try and do all the time.
- Tag or Keyword your images; this gives you a way to search for them years from now. This is vital. the sooner you do this the better.
- Catalogue your images as you download them - that means put them into a sensible file/folder system in one place, not randomly scattered all over your computer! Most photo software allows you to import photos in “date order” - this is a pretty good way of organising them so if you don’t have a better plan, import them like that, in date order.
- And then back them up somewhere else - preferable on an external hard drive, or maybe on-line or even onto DVD if you don’t have anything better.
Developing your photos
Now that you have all your latest photos downloaded off your camera onto your computer, given them basic tags and keywords, imported them in date order (if that’s the cataloguing system you’ve opted for) and got them in a specific place on you’re computer (did you choose My Pictures?)…you’re ready to edit, fix, re-size and upload to your destination.
Edit your photos
Editing means going through them and selecting the great shots you want to keep, noting the also-ran’s and deleting the disasters and “so-boring-I-never-want-to-see-them-again’s”!
On the first run through, if you have any way of “flagging” or rating your shots, rate everything that looks good with one set of flags or ratings (these are your “picks” and everything that looks rubbish with another. If you’re brave enough, delete the rubbish, get it off the system, you don’t need to see it again. If you did a back-up like I said, then you have another version of it anyway, just in case you make a mistake.
Now go through the “picks” and un-flag anything which isn’t really, really good. You’ll end up with a small selection of real “picks” and whole bunch of “not-quite’s” - and your rubbish will be in the trash can. All photographers do this. It saves you having to wade through rubbish, keeps it off your system and frees up a lot of storage space. And, it teaches you to become selective, discerning and attentive to what looks good, what works, and more importantly what doesn’t. This is crucial if you want to improve your photography.
Fix your photos
If you set your camera up to shoot Jpegs and you paid attention to setting the “picture styles” up with the proper values for things like colour saturation, sharpening, white balance and so on, then your photos should look pretty good straight out of the camera, assuming you achieved a good exposure!
Trouble is - this doesn’t always happen and anyway, most photos benefit from a bit of “tweaking”.
Cropping and rotating
So, using your photo editing application open the photo you want to work on and start by cropping it. To read how to do that in Windows go here: http://windows.microsoft.com/en-GB/windows-vista/Crop-a-picture
Cropping means cutting out the bits that you don’t want, like distracting trees or telephone poles or cars or whatever got into your composition by mistake. Or it can mean changing the shape or emphasis in your photo by re-directing the viewers attention to one side or the other or the middle. Might as well get this bit done first because there’s point in trying to “tweak” bits of the photo that you are later going to discard anyway.
Once you have your image cropped you might want to rotate it to straighten up the horizon line or make verticals a bit more, well vertical! Most crop tools can do this too.
Fixing exposure
Next we need to fix any exposure problems. Is your photo too dark or too light? Most photo applications have some way of altering the exposure with a simple click of a button. Usually these free tools are crude and global and don’t allow much finesse! That’s why photographers use specialist applications like Lightroom and Photoshop. If you’d like a sneak preview of just how powerful these tools are here’s a link…
Wow! Good isn’t it? OK it costs money - but so does your camera and your lenses and everything else but it’s only proper, decent software that’s going to enable you to get the most out of your images isn’t it?
For PC Windows users, there’s a page on “tips for editing your photos” here:
Re-sizing and saving your photos
Once you have the photo looking the way you want, you are ready to save it.
Because you are working with Jpeg files, any changes you have made to the file (crop, exposure etc) will be written back to the original file unless you change it’s name.
THIS IS IMPORTANT - READ AND UNDERSTAND:
If I have an original file called “myphoto_1234.jpg”, and I do some image editing on it, I will have changed a lot of the file information. None of these changes will be permanent until I hit the save button but I DON”T want to do this - don’t hit the save button - instead hit the save as button.
If I have an original file called “myphoto_1234.jpg”, and I do some image editing on it, I will have changed a lot of the file information. None of these changes will be permanent until I hit the save button but I DON”T want to do this - don’t hit the save button - instead hit the save as button.
This makes a copy of the original file and leaves the original in it’s unaltered state. When you hit the save as button you are asked to name the new jpeg file. Make sure your give the new version a different name - say, “myphotoEdit_1234.jpeg”.
Giving the file a new name means the computer will recognise the file as different from the original. It will write all the changes you made to this new file and store it wherever you specify - either alongside the original file or in a different folder and file. You can make as many copies of the original file as you like with lots of different changes to each one, in different shapes and sizes, saving them at different resolutions and quality levels, some good for prints, some good for email, some good for web (like your tumblr blog). As long as you rename each one, and hit “save as”, the original stays untouched - which means if you get the image processing hopelessly wrong or make a radical change (just for fun) you can always go back to the original and start again.
Save as what?
When you hit the “save as” button, you will get a dialogue box that asks you for some info. You have to give your file a name as we just discussed. But you also get to give your file a quality setting. This is normally either numerical (1-10) or descriptive (High, Med, Low). This means that the software will re-size your image and compress your photo file-size to fit big size/low compression or small size/high compression or somewhere in between. For web use you want a small size and high compression so your images display quickly and don’t take up much space.
In terms of file size and values, you want to achieve a file size of around 400KB at 72dpi. Try “saving as” quality level 4 or 5 and see what the file size looks like or use “save as” Low or web size or web quality - what ever your software offers you and again try it out.
What is dpi/ppi?
With some software you get to choose even more parameters, like dpi.
300dpi is high resolution suitable for publishing or photographic prints. 150-250 dpi is medium resolution suitable for ink jet printing and 72dpi is low resolution suitable for email and websites. But dpi doesn’t change the quality of your photo, it just specifies how big or small your picture will print or appear on a page, that’s all. Dpi and ppi are the same thing, dpi is dots per inch, ppi is pixels per inch - what they really mean is how many of you images pixels will printed for every inch of paper.
If you have 3000 pixels on the long edge of your photo and you print your photo at 300 pixels per inch, your photo will use 300 pixels for every inch of paper. So your print will be 10 inches long. Simple as that. Nothing to do with quality.
So why do I have to specify 72dpi for web or email?
Actually you don’t - dots per inch don’t even exist on a computer monitor! The only reason the dpi is specified for monitor resolution is that Mac computers display a single inch of printed text in 72 pixels and PC’s display the same inch of text in 96 pixels, so the PC effectively enlarges the text - the whole thing is about font display and has nothing to do with photos!
However, the software industry as whole has incorporated the notion of dpi into software, often linking dpi settings to file sizing and compression with jpegs etc. It’s all very confusing but all we can do as photographers is nod our heads and accept that when we upload a picture to the web it should be 72dpi - even though, actually it doesn’t make any difference.
Sellecting 72dpi will keep our file sizes nice and small, so the image will load quicker!
If you are interested in reading more about this try here:
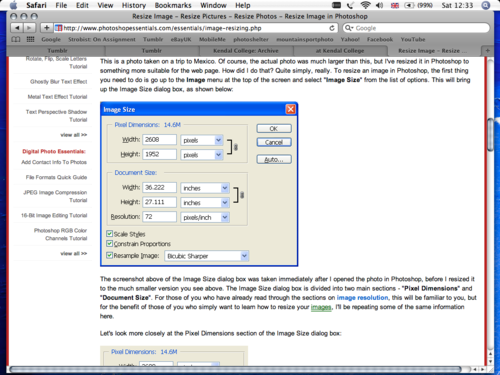
Resizing in Photoshop
If you use Photoshop and you are struggling to understand the re-sizing options, here’s a page on how to do it…
No comments:
Post a Comment