
All about exposure and histograms…
It’s possible that you have used a camera for a long time, exploiting the auto programs and modes without really grasping any of the principles of exposure, metering or interpreting histograms.
Exposure Compensation

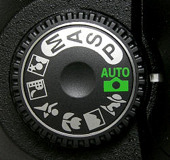
First of all, we should remind ourselves about the use and function of the exposure compensation controls. Normally indicated with a plus/minus symbol, the exposure compensation button or dial allows the photographer to shoot in a priority or program mode, whereby the camera does at least some of the exposure control. It doesn’t take long before the photographer realises that the camera’s built in exposure metering system is pretty good most of the time but not infallible. In fact there are plenty of situations where the camera is easily “fooled” by tricky or extreme lighting situations. Try shooting a portrait with the sun right behind the models head and you’ll find out quick enough.
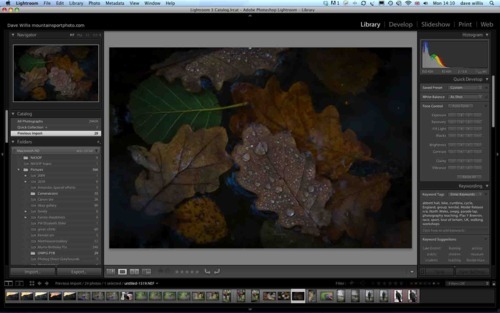
Here’s a shot of a walker, in bad weather (rain), in bad light (under trees) and with bright sky behind - enough to confuse any camera meter. The camera tries to find an exposure that will balance the extreme tonal range from highlight to shadow but it doesn’t know that the “walker” is the subject so it can’t prioritize it. The result is that overall, although the exposure is a good balance that includes most of the tonal range, the subject (walker) is too dark.
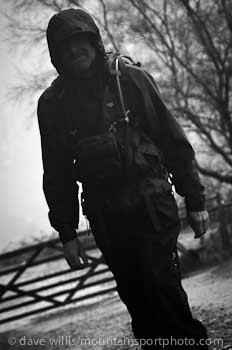
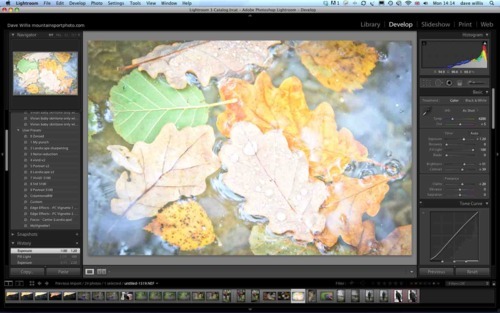
What can we do about this? We can use the exposure compensation button, adding some “plus” compensation to slightly over-expose the cameras settings and render the walker with more detail.
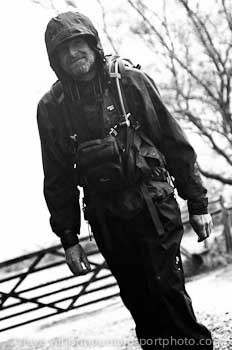
Of course, as we give the shot more exposure and “lighten” it up we force the brighter areas of the shot to over-expose by quite a bit. There’s no way around this, at least not without using a flash. Introducing flash into the exposure is a good way to compensate for extreme differences in exposure values in a composition because then we can expose for the highlights and just light up the dark areas with our flash…

So the exposure compensation tools that we have on our cameras will allow us to overcome situations where the camera meter is “fooled’ and allow us to “tweak’ the exposure either brighter or darker to get what we feel is an optimum exposure for our subject - usually at the expense of some other, background or foreground area of the frame.
Manual Exposure Mode
In MANUAL mode, (the “M” symbol) we can use the camera’s built in TTL (through the lens) light meter to gauge our exposures, by aligning the cursor with the “correct exposure” marker on the light meter.
Because we are using the camera in Manual mode we can set the exposure just as we like. We can over or under expose for the subject by as little or as much as we feel is necessary (a third of a stop at a time) and we can review the result on the camera monitor to see if we like the result. Clearly there is no need to use exposure compensation in Manual mode, (you are not having to “compensate” for the camera making any auto exposures) so this control is not normally available to you in this mode.
If you have never used Manual mode before, you might appreciate a bit of guidance; First of all try to decide what your “priority” is. If you are shooting sports, often the priority is using a fast shutter speed to stop the action - so you would set your chosen shutter speed and then use the meter to find the appropriate aperture to give you a good exposure. If your priority is depth of field, either short (portrait) or long (landscape), you would set the aperture of your choice and use the meter to find an appropriate shutter speed. If you are hand-holding the camera, one of your priorities will always be to eliminate “camera shake” by ensuring you are setting a fast enough shutter speed, but as always, the exact combination of shutter speed and aperture that you decide to use in the end will be your decision based on your particular creative intentions and priorities. In simple terms, using the manual mode is a case of setting one of the parameters and using the meter to determine the other.
Histograms

Understanding histograms is a key part of judging exposure in digital photography. It could be argued that histograms are not necessary when you can just look at the photo on the back of the camera but this ignores problems with viewing the camera monitor under bright lighting, accurately assessing highlight and shadow clipping and understanding tonal range.
First we should describe what the histogram function is and how to interpret it. The histogram is a simple bar chart - nothing more. It consists of 256 bars. The bars start at the left end of the baseline. The first bar is bar number ‘0” and represents how much Black you have in the photo. Not “nearly black”, or “almost black” but proper, absolute “black”. It’s called the Black Point. If there’s a lot of black in the photo this bar will reach a long way up the chart. If there is hardly any black at all it will barely get off the baseline. In the illustration above, there is no black at all indicated at bar “0” - the extreme left side of the baseline. So the height of each bar along the baseline indicates “quantity”.
At the extreme right end of the baseline is the “White Point”. This is tone value 256. The white point is not “nearly white” or “off-white” - it’s completely, absolutely white! In the histogram above, you can see there is a bit of “white” at the white point.
Between the Black Point and the White Point are all the other tones in the photo, ranging from nearly black, through to dark grey, mid grey, light grey, nearly white and finally white itself at the white point - 256 tones in the grey scale. Remember that how much of each tone you have is indicated by the height of each point along the scale. The middle tone - tone value 128 - is called the “Grey Point”. The histogram above indicates that the most amount of tone in the photo is mid grey or to put it another way - the mid tones.
What do we mean by tones?
The histogram above is not measuring colour - it’s only interested in “tone”, in other words, how light or dark parts of the photo are. If you shoot a colour photo and then turn it into a black and white photo, you get rid of the colour and are left with with a range of tones that we refer to as “greyscale” - ranging from black to white. This is what the histogram is looking at. The histogram shows us, very accurately, how much shadow, mid-tone and highlight our photo contains and how it’s spread out between black and white.
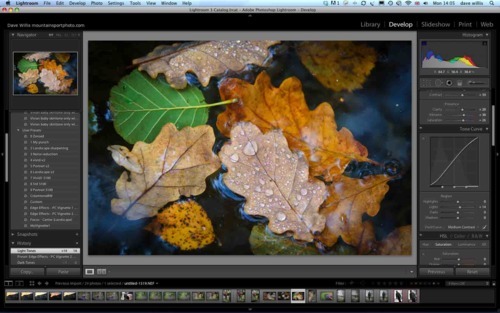
When we talk about a photo having a “full dynamic range” what we mean is that the photo contains a good range of tones from black, through the mid-tones to white and will therefore have good contrast. Like this photo above.
If however, the dynamic range is compressed - for example it might start at the black point but stop at or around the mid-tone area (value 128) - then there would be no highlights in the photo - no light areas. The reason for this might be that you filled the entire frame with a photo of a black wall! Or, more likely you have under-exposed the photo! Like the photo below. A correctly exposed photo will nearly always contain some highlights.
What about if the photo’s histogram starts over at the white point and only gets as far as the mid tones - but has no shadows? Chances are, you have over-exposed. Like this…
How to use Histograms pro-actively (highlight and shadow warnings).
Histograms are about more than just judging over or under exposure. When we over-expose an image and the white point is crowded, we call that “clipping” the whites. Same thing with the under-exposure - then the blacks get “clipped”. Clipped blacks can lead to noise and banding in the shadow areas when you try to rescue the photo with your editing software but clipping the whites is much worse.
In an over-exposed image, the white areas contain no information at all - the camera is unable to process the pixel data because it’s overloaded with light and so you get areas of the photo that are effectively empty! Because there is no data there, you can’t rescue the photo. Trying to adjust the image on the computer just results in large patches of grey tone because the computer has no idea what should be in these “empty” areas.
Fortunately the camera is equipped with highlight warning and sometimes also withshadow warning. You turn these options on in the menu system on your camera and the result is a flashing patch over areas of the photo that have been “clipped” showing you exactly where the over exposure (and under exposure if you have that option) are occurring. Now you can adjust your exposure and re-shoot to try and minimize the problem. And the great thing is, the histogram will allow you to see exactly how far you can go with either more or less exposure before you run into problems.
In the photo below, I have purposely pushed the highlights and shadows in order to show the highlight and shadow warning - highlight is red and shadow is blue - your camera will more likely use black and blue. Notice the histogram is “clipped’ at both ends.
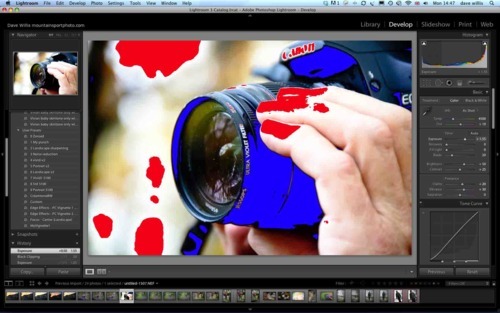
Using the histogram pro-actively allows you to maximize the best possible tonal range for your photo, allowing you to set an exposure that gathers the largest range of tones between the black and white points, before you start to clip either of them. You can’t do that by glaring at the photo on the back of the monitor!
Exposure Metering Patterns
Your camera is equipped with several ways of metering for exposure. It has, generally speaking, three metering methods or patterns, that can be chosen by the photographer; The first is called Evaluative or Matrix metering, then we have Centre-Weighted orPartial and finally we have Spot metering.
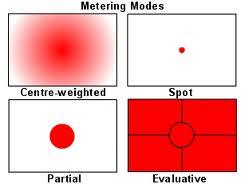
Most of time, Evaluative metering takes care of all our needs. It’s sophisticated, accurate and very flexible. Many photographers rarely, if ever use anything else. It takes exposure information from every part of the frame area and considers which focus points are active to work out where the subject is. The system can allocate importance to various areas of the frame based on this information and some even compare known parameters and lighting situations built into the cameras on-board data-base before coming up with a best-guess at the optimum exposure for your situation.
However, there are occasions when evaluative metering gets it wrong - then it’s time to switch to another method. Centre weighted and partial metering systems give emphasis to the centre of the frame with decreasing sensitivity to the outer edges. This assumes that the subject will occupy the centre of the frame and that it can safely ignore the outside, background areas. Perfect for portraiture in fact.
And finally we have spot metering where the camera only takes exposure information from a small, narrow (typically 3 or 4 degrees) angle of view in the very centre of the frame. To use this, the photographer must think of the spot area as a “target” and aim it at the important part or parts of the frame that need to be metered accurately, then use this information to figure out correct exposure.
No comments:
Post a Comment